To use the EasyPark parking meter to pay for parking, you first must load the card with value and then follow these simple steps:
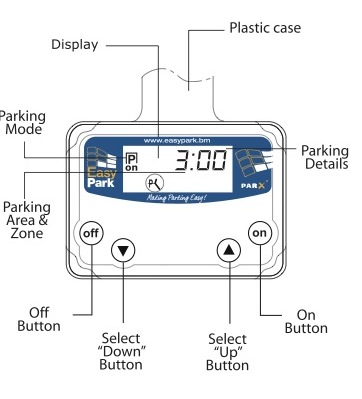
STEP 1 – Turn Parking Meter On
Press “ON”
The display will show your remaining credit balance available for parking.
Note: Make sure you have sufficient credit for the time you want to park in the city/zone based on the applicable parking rate.
STEP 2 – Select City/Town or Other Area for Parking
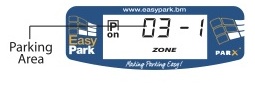
Press “ON” again
The display will flash the city/town code.
Using the arrow buttons, select the city/town where you are parking. The card is automatically pre-set to the code of the city/town where you last parked.
Note: The list of existing city/town codes is shown on the sticker on the back of your meter. Also, see our website: www.easypark.bm.
STEP 3 – Select the Parking Zone (Rate)
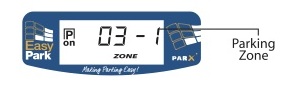
Press “ON” again
Having selected the city/town or other parking authority, on the right of the display next to the city/town code selected, the code for the parking zone will flash.
Using the arrow buttons, select the zone where you are parking. For convenience, the card is automatically pre-set to the zone where you last parked. In the case of city/town or other parking area with a single tariff zone just press “ON”.
Approximately 10 seconds after selecting the zone for parking, the meter automatically switches to parking mode “P” “ON”; and displays the code of the city and zone, date and the time your parking period ends. From this point on you start to pay for parking. While in parking mode, the meter emits a “beep” every minute to let you know that it is active (useful to remind you to shut it down when you get back to your vehicle).
Each city/town or other parking area has a maximum parking time limit. At the end of maximum parking time, the device will show “EXPT” (expired time).
Note: Where you select wrong city/town or zone at any stage, press “OFF” and start again from step 1.
STEP 4 – Displaying the Parking Meter

Once the meter is in parking mode, hang the device inside the window (preferably on the street curb side) of your car with the display facing outwards to ensure traffic officers can easily see that you paid for parking.
STEP 5 – Paying for Parking
Note: Visit our distributor locations to update your device for new cities/towns and/or zones and updated stickers showing city/town codes.